

Why You’ll Love This Red Velvet Whoopie Pies
Red velvet whoopie pies bring a fun twist to classic whoopie pie recipes with their vibrant color and rich taste. These soft, cake-like treats sandwiched with cream cheese filling delight home bakers and busy families alike. Discover what sets this red velvet whoopie pies recipe apart from ordinary desserts.
Ease of Preparation
- Whip up this whoopie pie recipe in under 45 minutes total, perfect for busy parents and students who want quick baking wins without fuss.
- No need for layering or precise frosting skills like with red velvet cake; just scoop batter, bake, and assemble for foolproof results every time.
- Simple pantry staples make it accessible, with steps anyone can follow for homemade red velvet whoopie pies that look bakery-fresh.
Health Benefits
- A small amount of cocoa powder adds antioxidants; check out these cocoa powder nutrition benefits for more on its perks.
- Buttermilk tenderizes the batter naturally while providing calcium, and you can swap for lighter options to fit diet-conscious plans.
- Portion-controlled pies satisfy sweet cravings moderately, better than full cakes for working professionals watching intake.
Versatility
- Adapt for vegan, gluten-free, or low-calorie needs with easy swaps, ideal for travelers or seniors with restrictions.
- Scale batch sizes for parties or solo treats, making them great for newlyweds hosting dinners or baking enthusiasts experimenting.
- Pair with coffee or milk, or gift as festive treats for any occasion.
Distinctive Flavor
- The subtle chocolate from cocoa, tangy buttermilk, and vinegar reaction create a unique mild cocoa tang unmatched in standard red velvet cookies.
- Cream cheese filling cuts through sweetness with its tang, elevating every bite of these soft red velvet whoopie pies.
- Red hue adds visual pop, perfect for holidays, drawing raves from food enthusiasts.
These red velvet whoopie pies with cream cheese filling turn ordinary baking days into special moments around the table.
This recipe shines for its balance of ease, taste, and adaptability, making it a go-to for all skill levels.
Jump to:
- Why You’ll Love This Red Velvet Whoopie Pies
- Ease of Preparation
- Health Benefits
- Versatility
- Distinctive Flavor
- Essential Ingredients for Red Velvet Whoopie Pies
- How to Prepare the Perfect Red Velvet Whoopie Pies: Step-by-Step Guide
- Dietary Substitutions to Customize Your Red Velvet Whoopie Pies
- Protein and Main Component Alternatives
- Vegetable, Sauce, and Seasoning Modifications
- Mastering Red Velvet Whoopie Pies: Advanced Tips and Variations
- How to Store Red Velvet Whoopie Pies: Best Practices
- FAQs: Frequently Asked Questions About Red Velvet Whoopie Pies
- What are red velvet whoopie pies?
- How do you make red velvet whoopie pies at home?
- What’s the best frosting for red velvet whoopie pies?
- Can you make red velvet whoopie pies without food coloring?
- How long do red velvet whoopie pies stay fresh?
- Red Velvet Whoopie Pies
- Ingredients
- Instructions
- Last Step:
- Notes
- Nutrition
- Did you make this recipe?
Essential Ingredients for Red Velvet Whoopie Pies
Gather these precise ingredients for your red velvet whoopie pies recipe, yielding about 24 pies. Each plays a key role in texture, color, and flavor. We’ve broken them down with explanations for clarity.
Main Ingredients:
- 2 cups all-purpose flour – Forms the soft, cake-like structure essential for whoopie pies.
- 1/4 cup unsweetened cocoa powder – Provides subtle chocolate flavor and reacts for the signature red hue.
- 1 teaspoon baking soda – Acts as leavener with vinegar for tender crumb.
- 1/2 teaspoon salt – Balances sweetness and enhances flavors.
- 1/2 cup softened butter – Creams with sugar for light, fluffy batter.
- 1 cup granulated sugar – Sweetens and aids browning for perfect texture.
- 1 large egg – Binds ingredients and adds richness.
- 1 cup buttermilk – Tenderizes with acidity, creating moist red velvet cookies.
- 2 teaspoons white vinegar – Triggers baking soda for rise and lightness.
- 1 teaspoon vanilla extract – Rounds out flavors with warmth.
- 1 ounce red food coloring (about 2 tablespoons liquid) – Gives the iconic vibrant red color.
- 8 ounces softened cream cheese – Base for tangy cream cheese filling.
- 1/2 cup softened butter (for filling) – Makes frosting smooth and spreadable.
- 2 cups powdered sugar (for filling) – Sweetens filling to balance cake’s tang.
- 1 teaspoon vanilla extract (for filling) – Adds depth to the cream cheese frosting.
Special Dietary Options:
- Vegan: Use plant-based buttermilk (almond milk + 1 tbsp lemon juice), vegan butter, flax egg (1 tbsp flax + 3 tbsp water), and dairy-free cream cheese.
- Gluten-Free: Swap all-purpose flour for 1:1 gluten-free blend; ensure cocoa and baking soda are certified GF.
- Low-Calorie: Reduce butter to 1/4 cup per part, use Greek yogurt in place of some cream cheese, and opt for sugar substitute like erythritol.
| Dietary Need | Key Swap | Benefit |
|---|---|---|
| Vegan | Dairy-free alternatives | Full flavor without animal products |
| Gluten-Free | GF flour blend | Same soft texture |
| Low-Cal | Reduced fats/sweeteners | Fewer calories per pie |
These choices keep your easy red velvet whoopie pies delicious and inclusive.
How to Prepare the Perfect Red Velvet Whoopie Pies: Step-by-Step Guide
Follow this detailed whoopie pie recipe for homemade red velvet whoopie pies that impress. Total time: 45 minutes. Preheat oven to 350°F. Line baking sheets with parchment. This method ensures even baking and easy removal. Adapt for dietary needs by using swaps from earlier.
First Step: Prepare Mise en Place
Gather all tools: mixing bowls, whisk, electric mixer, cookie scoop, piping bag for filling. Measure dry ingredients: whisk 2 cups flour, 1/4 cup cocoa, 1 tsp baking soda, 1/2 tsp salt in one bowl. Softening butter ahead saves time. For gluten-free, use blend now. This setup keeps baking smooth for beginners.
Second Step: Cream Wet Batter Ingredients Beat 1/2 cup softened butter and 1 cup sugar until fluffy, about 2 minutes. Add 1 egg, beat well. Mix in 1 cup buttermilk, 2 tsp vinegar, 1 tsp vanilla, and 1 oz red food coloring gradually. Batter turns bright red. For vegan, use flax egg here. Low-cal tip: use half butter, half applesauce.
Third Step: Combine Wet and Dry Mixtures Gently fold dry into wet until just combined; avoid overmixing for tender cakes. Batter should be thick like brownie batter. If too thick, add 1 tbsp buttermilk. Chill 30 minutes for even shapes, especially helpful for soft red velvet whoopie pies. Vegan batter holds up well chilled.
Fourth Step: Scoop and Bake Drop 2-tablespoon mounds 2 inches apart on sheets (about 48 total for 24 pies). Bake 10-12 minutes until tops spring back. Rotate sheets midway for evenness. Cool on sheets 5 minutes, then wire rack fully. They firm as they cool. GF version may need 1 extra minute.
Fifth Step: Make Cream Cheese Filling Beat 8 oz cream cheese and 1/2 cup butter until smooth. Gradually add 2 cups powdered sugar and 1 tsp vanilla; beat 3-5 minutes for fluffiness. For richer version like in advanced tips, use 4 cups sugar. Chill 15 minutes. Low-cal: light cream cheese works great.
Sixth Step: Assemble Whoopie Pies Pair similar-sized cookies. Pipe or spread 2 tbsp filling on flat side of one, top with another. Press gently. Yields 24 red velvet whoopie pies with cream cheese filling. Dust with powdered sugar if desired. Store as noted later.
Final Step: Finishing Touches and Serving Serve at room temp for best texture. Pair with milk or tea. For parties, arrange on platters. These easy red velvet whoopie pies shine at gatherings. Troubleshooting: flat pies? Check baking soda freshness. Soggy? Ensure full cooling.
Patience in cooling makes all the difference for picture-perfect pies.
This step-by-step ensures success, even for first-timers adapting cake mix whoopie pies style with from-scratch quality.

Dietary Substitutions to Customize Your Red Velvet Whoopie Pies
Protein and Main Component Alternatives
The main components are flour and egg for structure. Swap all-purpose flour for almond flour (2 1/4 cups for nutty flavor, keto-friendly) or oat flour for heartier texture. Use aquafaba (3 tbsp) or commercial egg replacer instead of egg for vegan diets. These keep whoopie pies soft without gluten or animal products, suiting seniors or diet-conscious eaters.
Vegetable, Sauce, and Seasoning Modifications
No veggies originally, but add pureed beets (1/4 cup) for natural color sans dye, boosting moisture and antioxidants. For sauce-like tang, increase vinegar to 1 tbsp or add lemon zest. Seasonings: boost cocoa to 1/3 cup for deeper chocolate like red velvet cookies, or add 1/2 tsp cinnamon. Low-cal: stevia in filling. Seasonal: pumpkin puree (1/4 cup) in fall for twist. Always test small batches.
| Original | Substitution | Use Case |
|---|---|---|
| Red food coloring | Beet puree | Natural color |
| Buttermilk | Almond milk + acid | Vegan |
| Egg | Flax egg | Plant-based |
These tweaks make homemade red velvet whoopie pies fit any lifestyle.
Mastering Red Velvet Whoopie Pies: Advanced Tips and Variations
Take your red velvet whoopie pies to pro level with these insights. Inspired by recipes like this trusted red velvet whoopie pies recipe.
Pro Cooking Techniques: Sift dry ingredients to avoid lumps. Use room-temp everything for emulsion. Bake one sheet at a time for even heat. Weigh flour (260g) for precision.
Flavor Variations: Add white chocolate chips to batter. Infuse filling with espresso for mocha pies. Or make strawberry by swirling jam into filling.
Presentation Tips: Pipe filling with star tip for ruffles. Garnish with crushed pecans or red sprinkles. Stack on tiered stands for parties.
Make-Ahead Options: Bake cookies up to 3 days ahead, store airtight. Freeze baked cookies 3 months. Assemble day-of. Filling keeps 1 week in fridge.
For more ideas, check our classic whoopie pies recipe. These elevate basic whoopie pie recipes effortlessly.
Small tweaks yield big flavor wins in your baking journey.
How to Store Red Velvet Whoopie Pies: Best Practices
Proper storage keeps your red velvet whoopie pies fresh and tasty. The cream cheese filling adds moisture, so handle carefully.
Refrigeration: Store in single layer in airtight container up to 1 week. Cover loosely after 2 days to avoid condensation. Bring to room temp 30 minutes before eating.
Freezing: Wrap individually in plastic, then freezer bag. Freeze up to 2 months. Thaw in fridge overnight or counter 30 minutes. Dust with sugar post-thaw.
Reheating: No need; room temp revives texture. Avoid microwave to prevent sogginess.
Meal Prep Considerations: Bake batch, freeze halves. Great for busy schedules. Label with dates. High humidity? Add silica packets.
- Room temp: 3-5 days max.
- Avoid stacking fresh to prevent sticking.
Follow these for red velvet whoopie pies cream cheese frosting that stays perfect.

FAQs: Frequently Asked Questions About Red Velvet Whoopie Pies
What are red velvet whoopie pies?
Red velvet whoopie pies are soft, cake-like cookies sandwiched with creamy filling, featuring the signature red color and subtle chocolate flavor of red velvet cake. Unlike traditional chocolate whoopie pies from Pennsylvania Amish country, these get their hue from red food coloring and taste from cocoa powder, buttermilk, and a reaction between vinegar and baking soda for tenderness. The classic filling is tangy cream cheese frosting, making them a festive treat for holidays or parties. Each pie is about 3-4 inches wide, yielding 12-18 per batch. They’re easier to make than layer cakes since no layering or frosting skills are needed—just pipe or spoon the batter, bake, and assemble. Perfect for beginners, they store well and freeze for up to 2 months.
How do you make red velvet whoopie pies at home?
Start with these simple steps for 24 whoopie pies. Preheat oven to 350°F and line baking sheets with parchment. Whisk 2 cups flour, 1/4 cup cocoa, 1 tsp baking soda, and 1/2 tsp salt. In another bowl, beat 1/2 cup softened butter, 1 cup sugar, and 1 egg until fluffy. Mix in 1 cup buttermilk, 2 tsp vinegar, 1 tsp vanilla, and 1 oz red food coloring. Combine wet and dry ingredients gently. Scoop 2-tbsp mounds 2 inches apart; bake 10-12 minutes until springy. Cool completely. For filling, beat 8 oz cream cheese, 1/2 cup butter, 2 cups powdered sugar, and 1 tsp vanilla until smooth. Sandwich 2 cookies with 2 tbsp filling. Total time: 45 minutes. Tip: Chill batter 30 minutes for even shapes.
What’s the best frosting for red velvet whoopie pies?
Cream cheese frosting is the top choice for red velvet whoopie pies, balancing the cake’s mild cocoa tang with sweet, creamy richness. Beat 8 oz softened cream cheese, 1/2 cup unsalted butter, 4 cups sifted powdered sugar, 1 tsp vanilla extract, and a pinch of salt for 3-5 minutes until light and spreadable—yields about 3 cups. For stability, chill 15 minutes before piping. Avoid runny icings; this holds up without sogginess. Variations include adding 1/2 tsp cinnamon for warmth or white chocolate chips for texture. It pipes easily using a star tip for ruffled edges. Stores in fridge up to 1 week; let soften 10 minutes before using. This combo mimics bakery-quality pies and earns rave reviews every time.
Can you make red velvet whoopie pies without food coloring?
Yes, skip the food coloring for naturally hued “pink velvet” whoopie pies using beet powder or pureed beets for color and moisture. Replace 1 oz red coloring and reduce buttermilk to 3/4 cup, adding 1/4 cup beet puree (blend cooked beets) or 2 tbsp beet powder mixed with water. The batter turns reddish-pink from beets’ pigments and cocoa’s reaction. Flavor stays authentic with 1/4 cup Dutch-process cocoa, buttermilk tang, and vinegar. Bake as usual at 350°F for 10-12 minutes. Results: softer texture, earthy undertone, and antioxidant boost. No artificial dyes needed—ideal for natural diets. Test a small batch; adjust beet for deeper color. Pairs perfectly with cream cheese filling for 20 pies.
How long do red velvet whoopie pies stay fresh?
Homemade red velvet whoopie pies last 3-5 days at room temperature in an airtight container, thanks to the cream cheese filling’s moisture. For longer storage, refrigerate up to 1 week in a single layer to prevent sticking—bring to room temp before eating for best texture. Freeze assembled pies up to 2 months: wrap individually in plastic, then foil or freezer bags. Thaw overnight in fridge or 30 minutes at room temp. Avoid microwaving to prevent soggy cakes. Pro tip: Dust with powdered sugar post-thaw for freshness. High humidity shortens shelf life, so use silica packets if needed. Properly stored, they taste fresh-baked; share within days for peak enjoyment.
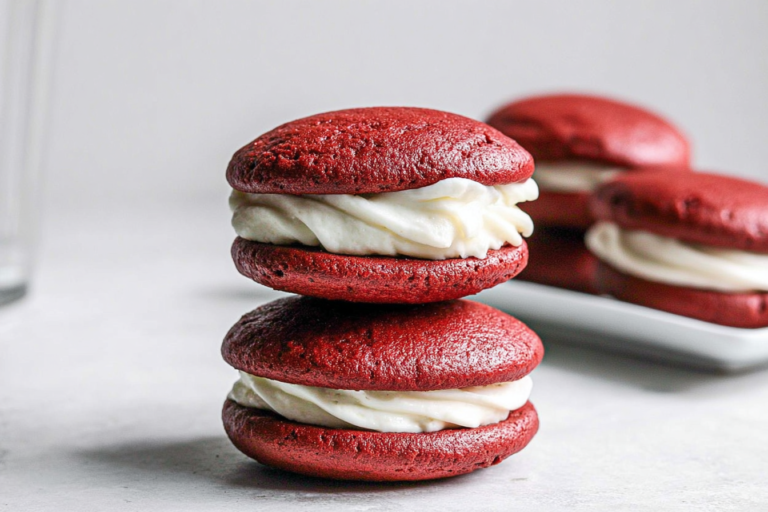
Red Velvet Whoopie Pies
🎂❤️ Iconic red velvet whoopie pies deliver moist tender chocolatey cakes creamy tangy cream cheese filling bliss.
🧁 Crowd-pleasing sandwich cookies perfect parties holidays bake sales instant hit!
- Total Time: 1 hour
- Yield: 12 whoopie pies
Ingredients
– 2 cups all-purpose flour
– 1/4 cup unsweetened cocoa powder
– 1 teaspoon baking soda
– 1/2 teaspoon salt
– 1/2 cup softened butter
– 1 cup granulated sugar
– 1 large egg
– 1 cup buttermilk
– 2 teaspoons white vinegar
– 1 teaspoon vanilla extract
– 1 ounce red food coloring (about 2 tablespoons liquid)
– 8 ounces softened cream cheese
– 1/2 cup softened butter for filling
– 2 cups powdered sugar for filling
– 1 teaspoon vanilla extract for filling
Instructions
1-First Step: Prepare Mise en Place Gather all tools: mixing bowls, whisk, electric mixer, cookie scoop, piping bag for filling. Measure dry ingredients: whisk 2 cups flour, 1/4 cup cocoa, 1 tsp baking soda, 1/2 tsp salt in one bowl. Softening butter ahead saves time. For gluten-free, use blend now. This setup keeps baking smooth for beginners.
2-Second Step: Cream Wet Batter Ingredients Beat 1/2 cup softened butter and 1 cup sugar until fluffy, about 2 minutes. Add 1 egg, beat well. Mix in 1 cup buttermilk, 2 tsp vinegar, 1 tsp vanilla, and 1 oz red food coloring gradually. Batter turns bright red. For vegan, use flax egg here. Low-cal tip: use half butter, half applesauce.
3-Third Step: Combine Wet and Dry Mixtures Gently fold dry into wet until just combined; avoid overmixing for tender cakes. Batter should be thick like brownie batter. If too thick, add 1 tbsp buttermilk. Chill 30 minutes for even shapes, especially helpful for soft red velvet whoopie pies. Vegan batter holds up well chilled.
4-Fourth Step: Scoop and Bake Drop 2-tablespoon mounds 2 inches apart on sheets (about 48 total for 24 pies). Bake 10-12 minutes until tops spring back. Rotate sheets midway for evenness. Cool on sheets 5 minutes, then wire rack fully. They firm as they cool. GF version may need 1 extra minute.
5-Fifth Step: Make Cream Cheese Filling Beat 8 oz cream cheese and 1/2 cup butter until smooth. Gradually add 2 cups powdered sugar and 1 tsp vanilla; beat 3-5 minutes for fluffiness. For richer version like in advanced tips, use 4 cups sugar. Chill 15 minutes. Low-cal: light cream cheese works great.
6-Sixth Step: Assemble Whoopie Pies Pair similar-sized cookies. Pipe or spread 2 tbsp filling on flat side of one, top with another. Press gently. Yields 24 red velvet whoopie pies with cream cheese filling. Dust with powdered sugar if desired. Store as noted later.
7-Final Step: Finishing Touches and Serving Serve at room temp for best texture. Pair with milk or tea. For parties, arrange on platters. These easy red velvet whoopie pies shine at gatherings. Troubleshooting: flat pies? Check baking soda freshness. Soggy? Ensure full cooling.
Last Step:
Please leave a rating and comment letting us know how you liked this recipe! This helps our business to thrive and continue providing free, high-quality recipes for you.Notes
🌡️ Room temperature ingredients – smooth batter perfect rise.
⏱️ Slight dome okay – flatten gently before baking even pies.
❄️ Chill filled pies 30 minutes – sets filling easier eating.
- Prep Time: 20 minutes
- Chilling Time (optional): 30 minutes
- Cook Time: 12 minutes
- Category: Dessert
- Method: Bake
- Cuisine: American
- Diet: Vegetarian
Nutrition
- Serving Size: 1 whoopie pie
- Calories: 420 kcal
- Sugar: 35g
- Sodium: 320mg
- Fat: 22g
- Saturated Fat: 13g
- Unsaturated Fat: 7g
- Trans Fat: 0g
- Carbohydrates: 52g
- Fiber: 1g
- Protein: 5g
- Cholesterol: 65mg





