

Why You’ll Love These Cream Cheese Mints
If you are looking for a sweet little treat that feels nostalgic, simple, and fun to make, these Cream Cheese Mints are a perfect fit. This cream cheese mints recipe is one of those easy no bake sweets that works for holidays, weddings, baby showers, and everyday snacking alike. They come together fast, use just a few basic ingredients, and have a smooth peppermint flavor that keeps people reaching for one more.
- Easy to make: These easy cream cheese mints need no oven, no fancy tools, and very little hands-on time. With just 15 minutes of prep, you can mix, shape, and let them dry while you handle the rest of your day.
- Light and satisfying: Each mint is only 41 calories, which makes them a nice small bite when you want a sweet treat without going overboard. They also have a soft texture that feels indulgent without being heavy.
- Great for many occasions: These cream cheese candy bites can be tinted with food coloring for parties, shaped with molds for holidays, or kept plain for a simple classic look. They are great for gifting too.
- Fresh peppermint flavor: The mix of peppermint extract, vanilla, cream cheese, and powdered sugar gives these no bake mints a cool, creamy, melt-in-your-mouth taste that feels both old-fashioned and timeless.
These easy no bake cream cheese mints are the kind of recipe that feels special, but still fits into a busy day.
For readers who enjoy simple sweets and crowd-pleasing treats, this recipe is a lovely one to keep in your back pocket. If you like easy desserts for sharing, you may also enjoy browsing more simple recipes on Savoring Flavors.
Jump to:
- Why You’ll Love These Cream Cheese Mints
- Essential Ingredients for Cream Cheese Mints
- Special Dietary Options
- How to Prepare the Perfect Cream Cheese Mints: Step-by-Step Guide
- First Step: Beat the cream cheese and butter
- Second Step: Add some of the powdered sugar
- Third Step: Mix in the peppermint and vanilla
- Fourth Step: Keep adding powdered sugar until the dough is stiff
- Fifth Step: Add color if you want it
- Sixth Step: Shape the mints
- Seventh Step: Make molded shapes if you prefer
- Eighth Step: Let the mints dry
- Ninth Step: Store them the right way
- Recipe timing at a glance
- Dietary Substitutions to Customize Your Cream Cheese Mints
- Protein and Main Component Alternatives
- Vegetable, Sauce, and Seasoning Modifications
- Mastering Cream Cheese Mints: Advanced Tips and Variations
- Pro cooking techniques
- Flavor variations
- Presentation tips
- Make-ahead options
- How to Store Cream Cheese Mints: Best Practices
- Refrigeration
- Freezing
- Reheating
- Meal prep considerations
- Nutrition Information for Cream Cheese Mints
- FAQs: Frequently Asked Questions About Cream Cheese Mints
- What type of cream cheese works best for cream cheese mints?
- What should the dough consistency be like for cream cheese mints?
- Can I use food coloring in cream cheese mints?
- How do I make cream cheese mints with molds?
- How should I store cream cheese mints?
- Cream Cheese Mints
- Ingredients
- Instructions
- Last Step:
- Notes
- Nutrition
- Did you make this recipe?
Essential Ingredients for Cream Cheese Mints
This homemade cream cheese mints recipe uses a short list of pantry-friendly ingredients. The key is starting with the right cream cheese and enough powdered sugar to create a stiff dough that can be shaped easily.
- 4 oz (113 g) softened brick-style cream cheese: This is the base of the recipe and gives the mints their creamy texture. Brick-style cream cheese works best because it firms up well.
- 1 tablespoon salted butter, softened: Butter adds richness and helps the mixture blend smoothly.
- 4 cups (500 g) powdered sugar, plus more as needed: Powdered sugar sweetens the dough and helps it become stiff enough to roll and mold. You may need extra if the mixture feels sticky.
- 1/2 teaspoon peppermint extract: This gives the mints their classic cool flavor.
- 1/8 teaspoon vanilla extract: A small amount adds warmth and rounds out the peppermint taste.
- Optional food coloring: Use this if you want pastel or bright colored mints for holidays, weddings, or gift trays.
Special Dietary Options
- Vegan: Swap the cream cheese and butter for plant-based versions, then adjust powdered sugar as needed until the dough is stiff.
- Gluten-free: This recipe is naturally gluten-free as written, since the ingredients listed do not contain gluten.
- Low-calorie: To keep portions lighter, shape smaller mints and enjoy one or two at a time. The recipe already makes small bites, which helps with portion control.
| Ingredient | Amount | Why It Matters |
|---|---|---|
| Brick-style cream cheese | 4 oz (113 g) | Creates the creamy base and proper structure |
| Salted butter | 1 tablespoon | Adds richness and smooth texture |
| Powdered sugar | 4 cups (500 g), plus more as needed | Sweetens and firms the dough |
| Peppermint extract | 1/2 teaspoon | Provides the classic mint flavor |
| Vanilla extract | 1/8 teaspoon | Rounds out the flavor |
| Food coloring | Optional | Adds color for special events |
How to Prepare the Perfect Cream Cheese Mints: Step-by-Step Guide
Making easy no bake cream cheese mints is simple, but the texture matters. The goal is a stiff, pliable dough that feels smooth and easy to shape. Once you get the hang of it, this easy no bake cream cheese mints recipe becomes a fast favorite for holidays and gift trays.
First Step: Beat the cream cheese and butter
Start by placing the softened brick-style cream cheese and softened salted butter in a mixing bowl. Beat them together until the mixture looks creamy and smooth. This step matters because lumps now can make shaping harder later. If you are using a hand mixer, keep the speed moderate so the mixture stays fluffy without becoming too soft.
Second Step: Add some of the powdered sugar
Next, add 2 cups of the powdered sugar on low speed. Mix slowly so the sugar does not fly out of the bowl. At this stage, the mixture will still be soft, and that is okay. The sugar starts building the structure that turns the creamy base into a rollable dough. Scrape the sides of the bowl if needed.
Third Step: Mix in the peppermint and vanilla
Once the first amount of sugar is blended in, add the peppermint extract and vanilla extract. Stir well so the flavor spreads evenly through the dough. The peppermint gives that classic cool taste, while the tiny bit of vanilla softens the sharp mint flavor. This balance is what makes these cream cheese mints taste so pleasant.
Fourth Step: Keep adding powdered sugar until the dough is stiff
Now keep adding the rest of the powdered sugar gradually. Mix after each addition and scrape down the bowl sides often. The dough should become very stiff and no longer sticky. This is one of the most important parts of the whole recipe. If the dough still feels tacky, add a little more powdered sugar until it holds its shape easily. The finished dough should feel like soft play-dough, not a batter.
Stiff dough is the secret to good cream cheese mint texture. If the mixture feels sticky, it usually just needs a bit more powdered sugar.
Fifth Step: Add color if you want it
If you want pastel pink, green, yellow, or blue mints, divide the dough into portions and mix in food coloring now. Liquid food coloring works best for soft pastel shades, while gel food coloring gives brighter, richer colors. Add color little by little, since too much liquid can soften the dough. If you are making multiple colors, use separate bowls or gloves to keep the colors neat.
Sixth Step: Shape the mints
For classic fork-pressed mints, roll the dough into teaspoon-sized balls. Place them on a wax paper-lined baking sheet so they do not stick. Then gently press each ball with a fork dipped in powdered sugar. The powdered sugar on the fork helps keep the tines from sticking to the dough. You can also flatten them slightly with your fingers if you want a softer, more rustic look.
Seventh Step: Make molded shapes if you prefer
If you want a fancier style, roll the dough balls in granulated sugar before pressing them into molds. This helps the dough release cleanly. Press firmly, then pop the shape out once it sets. Molded cream cheese candy is especially pretty for parties, bridal showers, and holiday trays. It also makes the mints look handmade in the best possible way.
Eighth Step: Let the mints dry
Let the mints dry at room temperature for several hours until firm. The drying time is about 3 hours, though a little longer is fine if the room is humid. During this time, the outside dries and the mints become easier to handle. Try not to move them too soon, or they may lose their shape.
Ninth Step: Store them the right way
Once firm, transfer the mints to an airtight container and store them in the refrigerator. Place them in single layers separated by wax paper so they do not stick together. This helps keep their shape and texture fresh.
Recipe timing at a glance
- Prep time: 15 minutes
- Drying time: About 3 hours
- Total time: 3 hours 15 minutes
- Yield: Approximately 50 mints

Dietary Substitutions to Customize Your Cream Cheese Mints
Protein and Main Component Alternatives
Since Cream Cheese Mints are a no bake candy, the main ingredients are dairy-based rather than protein-heavy. If you need a different setup, there are still a few easy swaps. Use plant-based cream cheese and vegan butter for a dairy-free version. Look for thick, block-style alternatives so the dough stays firm enough to shape. If the substitute is softer than regular cream cheese, you may need a little extra powdered sugar.
For a lower-sugar direction, you can make smaller mints and serve them alongside fresh fruit or coffee so a little goes a long way. The texture may change slightly, but the recipe will still work well if the dough remains stiff.
Vegetable, Sauce, and Seasoning Modifications
There are no vegetables or sauces in the base recipe, but the flavor can still change in fun ways. Swap peppermint extract for spearmint extract for a softer mint note. You can also add a tiny amount of lemon extract for a bright twist, though peppermint remains the classic choice.
For color, choose liquid food coloring for soft pastel shades or gel coloring for more vivid tones. If you are making the mints for a themed event, divide the dough into portions and color each one differently. This works well for baby showers, holidays, and wedding favor boxes. You can also press the mints into decorative molds for a polished look that still keeps the recipe simple.
Mastering Cream Cheese Mints: Advanced Tips and Variations
Once you have made these no bake candy cream cheese mints once or twice, the recipe becomes very easy to play with. A few small tricks can make a big difference in texture, shape, and presentation.
Pro cooking techniques
- Always use brick-style cream cheese, not the spreadable tub kind. The tub version has too much moisture.
- Add powdered sugar little by little until the dough is stiff and no longer sticky.
- Dip fork tines in powdered sugar before pressing the mints so the dough does not stick.
- Scrape the bowl sides often so every bit of the mixture gets evenly blended.
Flavor variations
You can keep the classic peppermint flavor or switch things up with tiny amounts of other extracts. Spearmint gives a softer mint profile, while vanilla can be boosted just a touch for a sweeter candy-style taste. For holiday trays, pastel pink peppermint mints are always pretty, while green or white mints feel fresh and classic.
Presentation tips
For a polished serving tray, line a plate or candy box with wax paper and arrange the mints in neat rows. If you are gifting them, place them in mini candy cups to help separate the pieces. Molded shapes work especially well for special occasions because they look elegant without much extra effort.
Make-ahead options
These homemade cream cheese mints recipe treats are ideal for making ahead. You can shape them a day or two before your event and keep them chilled until needed. That makes them a smart choice for busy parents, working professionals, and anyone planning a party menu. They also fit nicely into a dessert table with cookies, truffles, and other small sweets.
Make a double batch if you are serving a crowd. These little mints disappear fast.
How to Store Cream Cheese Mints: Best Practices
Good storage keeps Cream Cheese Mints tasting fresh and looking neat. Since they contain cream cheese, they should stay chilled when not being served.
Refrigeration
Store the mints in an airtight container in the refrigerator for up to 2 weeks. Keep them in single layers separated by wax paper so they do not stick together. This method helps them stay firm and smooth.
Freezing
If you want to keep them longer, freeze them in a sealed container or freezer bag for 3 to 6 months. Place parchment or wax paper between layers. Thaw them in the refrigerator overnight before serving.
Reheating
These mints do not need reheating. In fact, warming them would soften the texture too much. If they have been frozen, just let them thaw slowly in the fridge.
Meal prep considerations
These are a great make-ahead treat for parties and holiday trays. Since they hold well in the refrigerator, you can make them in batches and use them as needed. Just avoid leaving them at room temperature for more than 1 to 2 days, especially in warm or humid spaces.
Nutrition Information for Cream Cheese Mints
Here is the nutritional information per mint, based on the recipe provided. These numbers are helpful for readers who track intake or want a rough idea of portion size.
| Nutrient | Amount per Mint |
|---|---|
| Calories | 41 |
| Carbohydrates | 8g |
| Fat | 1g |
| Saturated Fat | 1g |
| Cholesterol | 3mg |
| Sodium | 10mg |
| Potassium | 3mg |
| Sugar | 8g |
| Vitamin A | 1 IU |
Because these are small treats, they work well for parties, dessert tables, and little after-dinner bites. If you want to keep portions light, serve them in small groups rather than large handfuls.

FAQs: Frequently Asked Questions About Cream Cheese Mints
What type of cream cheese works best for cream cheese mints?
For cream cheese mints, choose full-fat brick-style cream cheese, like Philadelphia, that’s been softened to room temperature. Avoid tub-style spreadable cream cheese, as it has higher moisture content and won’t firm up properly, leading to sticky or soft mints. Start with 3 ounces (about half an 8-ounce block) for a standard recipe yielding 50-60 mints. Soften it by leaving it out for 1-2 hours or microwaving in 10-second bursts. This ensures smooth mixing with powdered sugar, butter, and mint extract. Pro tip: If your cream cheese is too cold, it can cause lumps in the dough. Always check the label for “brick” or block style to get that perfect, moldable texture every time. (78 words)
What should the dough consistency be like for cream cheese mints?
The dough for cream cheese mints should feel stiff and pliable, much like play-dough—firm enough to hold shapes but not crumbly or sticky. After mixing softened cream cheese, 1/4 cup softened butter, 1 teaspoon mint extract, and about 4-5 cups powdered sugar, it should form a smooth ball without sticking to your hands. If it’s too soft or sticky, gradually knead in more powdered sugar, 1/4 cup at a time, until it reaches the right firmness. Test by pressing a small piece; it should hold its shape. This consistency prevents mints from spreading during storage and makes them easy to mold. Over-kneading can toughen them, so mix just until combined. (102 words)
Can I use food coloring in cream cheese mints?
Yes, food coloring adds fun pastel shades to cream cheese mints and is completely optional. Divide the stiff dough into 2-4 equal portions. Add 2-4 drops of gel food coloring (preferred for vibrant color without thinning the dough) to each portion, then knead thoroughly until evenly tinted—think pink, green, blue, or yellow for holidays. Wear gloves to avoid stained hands. If using liquid coloring, add sparingly to prevent softening the dough, and compensate with extra powdered sugar. Uncolored mints store just as well. This simple step lets you customize for weddings, showers, or parties, yielding dozens of eye-catching treats in under 30 minutes of active time. (98 words)
How do I make cream cheese mints with molds?
Making cream cheese mints with molds is quick and creates perfect shapes. First, ensure your dough is stiff and non-sticky. Pinch off a small piece (about 1 teaspoon), roll into a ball, and coat generously with granulated sugar (not powdered, to prevent sticking). Press firmly into a clean, powdered sugar-dusted mold, filling all details. Tap or invert the mold over a parchment-lined tray to release the mint— they should pop out cleanly. Repeat, re-dusting molds as needed. Let air-dry at room temperature for 12-24 hours to form a firm outer shell. This no-bake method works for plastic or metal molds and produces 50+ mints ready for gifting. (96 words)
How should I store cream cheese mints?
Store homemade cream cheese mints in a single layer in an airtight container in the refrigerator for up to 2 weeks—they stay soft and fresh thanks to the cream cheese. For longer storage, layer with parchment paper and freeze in an airtight container or freezer bag for 3-6 months; thaw in the fridge overnight. Avoid room temperature storage beyond 1-2 days, as they soften in humidity. Label containers with dates for easy tracking. This keeps flavors like peppermint or spearmint potent without drying out. Fun fact: Frozen mints make great “ice cube” treats for iced tea. Always check for off smells before serving. (92 words)
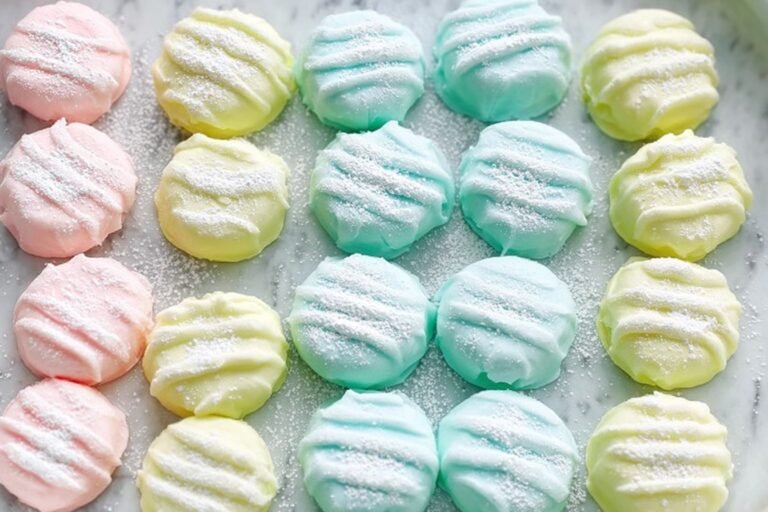
Cream Cheese Mints
🍬🧀 Silky cream cheese mints: no-bake melt-in-mouth candy with fresh peppermint zing – party or gift perfection!
💚 15-min effortless prep: customize colors, yields 50, stores weeks in fridge for anytime indulgence.
- Total Time: 3 hours 15 minutes
- Yield: 50 mints
Ingredients
– 4 oz (113 g) brick-style cream cheese for creamy base and proper structure
– 1 tablespoon salted butter for richness and smooth texture
– 4 cups (500 g), plus more as needed powdered sugar for sweetening and firming the dough
– 1/2 teaspoon peppermint extract for classic mint flavor
– 1/8 teaspoon vanilla extract for rounding out the flavor
– Optional food coloring for color for special events
Instructions
1-First Step: Beat the cream cheese and butter Start by placing the softened brick-style cream cheese and softened salted butter in a mixing bowl. Beat them together until the mixture looks creamy and smooth. This step matters because lumps now can make shaping harder later. If you are using a hand mixer, keep the speed moderate so the mixture stays fluffy without becoming too soft.
2-Second Step: Add some of the powdered sugar Next, add 2 cups of the powdered sugar on low speed. Mix slowly so the sugar does not fly out of the bowl. At this stage, the mixture will still be soft, and that is okay. The sugar starts building the structure that turns the creamy base into a rollable dough. Scrape the sides of the bowl if needed.
3-Third Step: Mix in the peppermint and vanilla Once the first amount of sugar is blended in, add the peppermint extract and vanilla extract. Stir well so the flavor spreads evenly through the dough. The peppermint gives that classic cool taste, while the tiny bit of vanilla softens the sharp mint flavor. This balance is what makes these cream cheese mints taste so pleasant.
4-Fourth Step: Keep adding powdered sugar until the dough is stiff Now keep adding the rest of the powdered sugar gradually. Mix after each addition and scrape down the bowl sides often. The dough should become very stiff and no longer sticky. This is one of the most important parts of the whole recipe. If the dough still feels tacky, add a little more powdered sugar until it holds its shape easily. The finished dough should feel like soft play-dough, not a batter.
5-Fifth Step: Add color if you want it If you want pastel pink, green, yellow, or blue mints, divide the dough into portions and mix in food coloring now. Liquid food coloring works best for soft pastel shades, while gel food coloring gives brighter, richer colors. Add color little by little, since too much liquid can soften the dough. If you are making multiple colors, use separate bowls or gloves to keep the colors neat.
6-Sixth Step: Shape the mints For classic fork-pressed mints, roll the dough into teaspoon-sized balls. Place them on a wax paper-lined baking sheet so they do not stick. Then gently press each ball with a fork dipped in powdered sugar. The powdered sugar on the fork helps keep the tines from sticking to the dough. You can also flatten them slightly with your fingers if you want a softer, more rustic look.
7-Seventh Step: Make molded shapes if you prefer If you want a fancier style, roll the dough balls in granulated sugar before pressing them into molds. This helps the dough release cleanly. Press firmly, then pop the shape out once it sets. Molded cream cheese candy is especially pretty for parties, bridal showers, and holiday trays. It also makes the mints look handmade in the best possible way.
8-Eighth Step: Let the mints dry Let the mints dry at room temperature for several hours until firm. The drying time is about 3 hours, though a little longer is fine if the room is humid. During this time, the outside dries and the mints become easier to handle. Try not to move them too soon, or they may lose their shape.
9-Ninth Step: Store them the right way Once firm, transfer the mints to an airtight container and store them in the refrigerator. Place them in single layers separated by wax paper so they do not stick together. This helps keep their shape and texture fresh.
Last Step:
Please leave a rating and comment letting us know how you liked this recipe! This helps our business to thrive and continue providing free, high-quality recipes for you.Notes
🧀 Brick-style cream cheese only – tubs make dough too soft.
📏 Dough must be stiff/non-sticky; add extra powdered sugar.
🍴 Fork in powdered sugar prevents sticking, clean impressions.
- Prep Time: 15 minutes
- Drying: 3 hours
- Cook Time: 0 minutes
- Category: Desserts
- Method: No-Bake
- Cuisine: American
- Diet: Vegetarian
Nutrition
- Serving Size: 1 mint
- Calories: 41 kcal
- Sugar: 8 g
- Sodium: 10 mg
- Fat: 1 g
- Saturated Fat: 1 g
- Unsaturated Fat: 0 g
- Trans Fat: 0 g
- Carbohydrates: 8 g
- Fiber: 0 g
- Protein: 0 g
- Cholesterol: 3 mg





