

Why You’ll Love This Christmas Tree Cheese Ball
If you need a festive starter that feels fun but does not keep you stuck in the kitchen, this Christmas Tree Cheese Ball is a holiday win. It looks like you spent hours on it, but the hands-on work is quick, and the ingredients are simple pantry-friendly basics. It is the kind of party food that gets people talking before the first cracker even hits the plate.
- Easy to make: You only need a bowl, a cookie sheet, and a little chill time. The mix comes together in about 10 minutes, then the fridge does most of the work.
- Great for busy holidays: Since it can be made ahead, this Christmas Tree Cheese Ball fits right into packed schedules for parents, students, and working professionals.
- Festive and crowd-friendly: The tree shape makes it a natural centerpiece for holiday tables, potlucks, and family gatherings.
- Rich, savory flavor: Cream cheese, sharp cheddar, onion, mustard, and a little red pepper sauce create a bold, tangy bite that pairs well with crackers.
Tip: If you want a holiday appetizer that feels playful without being fussy, this is one of those recipes that delivers every time.
It is also flexible. You can shape one large tree for a big party or make two smaller ones for a buffet table. If you like make-ahead recipes, this one gives you room to breathe during the busy holiday rush. For more party-friendly sweets to round out your spread, you might also like our pink popcorn snack idea or a cozy dessert like classic peach cobbler.
For readers who enjoy learning about the nutrition side of cheese, this overview from WebMD on the health benefits of cheese is a helpful place to start.
Jump to:
- Why You’ll Love This Christmas Tree Cheese Ball
- Essential Ingredients for Christmas Tree Cheese Ball
- Ingredients list
- Special dietary options
- How to Prepare the Perfect Christmas Tree Cheese Ball: Step-by-Step Guide
- First step: Mix the cheese base
- Second step: Chill until firm enough to shape
- Third step: Shape the tree
- Fourth step: Add the parsley coating
- Fifth step: Create the garlands
- Sixth step: Add ornaments and the star
- Seventh step: Serve with crackers
- Protein and Main Component Alternatives
- Easy swaps for the cheese base
- Serving swaps for different diets
- Vegetable, Sauce, and Seasoning Modifications
- Vegetable and garnish ideas
- Sauce and seasoning ideas
- Mastering Christmas Tree Cheese Ball: Advanced Tips and Variations
- Pro cooking techniques
- Flavor variations
- Presentation tips
- Make-ahead options
- How to Store Christmas Tree Cheese Ball: Best Practices
- Refrigeration
- Freezing
- Serving again
- Meal prep notes
- FAQs: Frequently Asked Questions About Christmas Tree Cheese Ball
- How do you shape a Christmas tree cheese ball?
- Can you freeze a Christmas tree cheese ball?
- What can I use instead of pine nuts in Christmas tree cheese ball for nut allergies?
- What is red pepper sauce in Christmas tree cheese ball recipe?
- How do you make the cheese star stay on top of a Christmas tree cheese ball?
- Christmas Tree Cheese Ball
- Ingredients
- Instructions
- Last Step:
- Notes
- Nutrition
- Did you make this recipe?
Essential Ingredients for Christmas Tree Cheese Ball
This Christmas Tree Cheese Ball recipe uses simple ingredients, but each one has a clear job to do. Cream cheese gives the mixture its soft, spreadable base. Sharp cheddar brings flavor and structure. Onion, mustard, and red pepper sauce add the savory kick that keeps every bite interesting.
Ingredients list
- 3 packages (8 ounces each) cream cheese, softened
- 4 cups shredded sharp cheddar cheese (16 ounces)
- 2 tablespoons grated onion
- 1/2 teaspoon ground dry mustard
- 5 or 6 drops red pepper sauce
- 1 cup finely chopped parsley, for serving and decoration
- 1/2 cup pine nuts, for serving and decoration
- 1/4 cup chopped red bell pepper or yellow bell pepper, for serving and decoration
- Assorted crackers, for serving
- Optional: slice of cheddar cheese or lemon peel for the star on top
| Ingredient | What it does |
|---|---|
| Cream cheese | Creates the creamy base and helps the tree hold shape after chilling |
| Sharp cheddar | Adds bold flavor and a firm texture |
| Grated onion | Brings a fresh savory bite |
| Dry mustard | Adds gentle tang and depth |
| Red pepper sauce | Gives a little heat without overpowering the cheese |
| Parsley | Makes the tree look like it has green branches |
| Pine nuts | Form garlands and add texture |
| Bell pepper | Works as colorful ornaments |
Special dietary options
- Nut-free: Skip the pine nuts and use chopped pomegranate seeds, extra bell pepper, or sunflower seeds instead.
- Gluten-free: Serve with gluten-free crackers or sliced vegetables.
- Lower-calorie serving idea: Pair smaller portions with cucumber rounds, celery, and bell pepper strips instead of lots of crackers.
- Lighter cheese swap: You can use reduced-fat cream cheese, though the texture may be a little softer.
How to Prepare the Perfect Christmas Tree Cheese Ball: Step-by-Step Guide
First step: Mix the cheese base
Start by placing the softened cream cheese in a large mixing bowl. Add the shredded sharp cheddar, grated onion, ground dry mustard, and red pepper sauce. Mix until everything is well combined and the mixture looks even, creamy, and thick. A sturdy spoon, hand mixer, or rubber spatula all work well here.
Take a quick taste before chilling. If you want a bit more kick, you can add another drop or two of red pepper sauce. If you prefer a milder appetizer, keep it as written. The flavors will deepen a little as the cheese mixture chills.
Second step: Chill until firm enough to shape
If you are making two cheese balls, divide the mixture in half. If you want one large Christmas Tree Cheese Ball, leave the mixture whole. Either way, cover the bowl and refrigerate it until it is firm enough to shape. This usually takes about 30 to 50 minutes, depending on how soft the cream cheese was at the start.
This step matters because the mixture needs to be sturdy enough to hold a cone shape. If you rush it, the tree may slump. If you are planning ahead, you can even chill it a little longer and let it soften slightly before shaping.
Third step: Shape the tree
Place the chilled cheese mixture onto a cookie sheet. Use your hands or a spatula to form it into a cone that looks like a Christmas tree. If you are making two, shape both portions into smaller cones. If you are making one large appetizer, build a taller tree with a wider base.
Try to keep the bottom a little wider than the top so it looks more like a real tree. A smooth surface helps the toppings stick better, but it does not need to be perfect. Holiday appetizers are allowed to look homemade and cheerful.
Fourth step: Add the parsley coating
Spread the finely chopped parsley in a shallow dish or on a plate. Roll the shaped cheese tree in the parsley, pressing lightly so the coating sticks evenly. If needed, gently pat extra parsley onto any spots that look bare.
This is what turns the cheese ball into a tree. The parsley gives it that fresh green color and makes the whole appetizer feel festive. It also adds a bit of freshness to balance the rich cheese.
Fifth step: Create the garlands
Press the pine nuts onto the tree in horizontal lines to form garlands. Work from top to bottom, spacing the lines evenly around the tree. The pine nuts add texture and help mimic the look of holiday decorations draped across branches.
If you are serving guests with nut allergies, swap the pine nuts for chopped pomegranate seeds, sunflower seeds, or extra red bell pepper pieces. That way you still get color and texture without using nuts.
Sixth step: Add ornaments and the star
Attach the chopped red or yellow bell pepper pieces to the tree as ornaments. A few small pieces scattered around the surface are all you need. Less is often more here, since the parsley and pine nuts already give you plenty of decoration.
For the top, cut a star from a slice of cheddar cheese or use a piece of lemon peel for a bright, simple topper. If the star keeps wobbling, use a toothpick to hold it in place. Chill the decorated tree again for a short time so everything sets up nicely.
Seventh step: Serve with crackers
Move the finished Christmas Tree Cheese Ball to a serving platter and surround it with assorted crackers. A sturdy cracker works best because the cheese ball is thick and rich. If you have a spreader on the plate, that helps too.
Let the cheese ball sit out for a short time before serving so it softens slightly. That makes it easier to spread and gives the best texture. If you made it ahead and chilled it for a long time, take it out a little early so it is not too firm at the table.
Serving note: This recipe makes about 10 servings and takes roughly 1 hour total, with 10 minutes of prep and about 50 minutes for shaping and chilling.
Protein and Main Component Alternatives
This recipe is centered on cream cheese and cheddar, but you can still adjust it if you need to work with what you have on hand or fit different dietary needs. The key is to keep the mixture thick enough to shape and firm enough to hold the tree form.
Easy swaps for the cheese base
- Reduced-fat cream cheese: Works if you want a lighter appetizer, though the tree may be slightly softer.
- Neufchatel cheese: A good stand-in for cream cheese with a similar texture.
- Extra-sharp cheddar: If you want a bigger cheese flavor, this is a strong swap for regular sharp cheddar.
- White cheddar: Gives a softer look while keeping the same basic flavor profile.
Serving swaps for different diets
- Vegetarian friendly: The recipe already fits vegetarian menus as written.
- Lower-carb serving idea: Serve with celery sticks, cucumber rounds, bell pepper strips, or radishes instead of crackers.
- More crowd-friendly option: Make one large tree if you are feeding a bigger group, so everyone can grab from the same centerpiece.
Vegetable, Sauce, and Seasoning Modifications
You can keep the same festive feel while adjusting the flavor to match your crowd. If you want a milder version, go easy on the red pepper sauce. If your guests like a little more punch, add a tiny bit more and taste as you mix.
Vegetable and garnish ideas
- Parsley: Essential for the green tree look, but chopped dill or chives can work in a pinch.
- Bell pepper: Red or yellow both work as ornaments, and they add a sweet crunch.
- Pomegranate seeds: A pretty option if you want a jewel-like look and a nut-free garnish.
- Olives: Tiny chopped green olives can add a salty twist if you want a brinier flavor.
Sauce and seasoning ideas
- Red pepper sauce: A few drops are enough for subtle heat.
- Worcestershire sauce: A good swap if you want savory depth without much spice.
- Lemon juice: Adds brightness and cuts through the richness.
- Paprika: Brings color and warmth without making the mixture too hot.
If you are making this for a mixed group, keep the base recipe mild and let guests add heat later with crackers, hot sauce, or pepper flakes on the side. That way no one feels left out.
Mastering Christmas Tree Cheese Ball: Advanced Tips and Variations
Pro cooking techniques
The biggest trick with this Christmas Tree Cheese Ball is texture. The cheese should be soft enough to mix but firm enough to shape. If it feels too sticky, chill it longer before molding. If it feels too stiff, let it sit at room temperature for a few minutes before shaping.
For cleaner decorations, work with cold cheese and dry toppings. Pat the parsley dry if needed, since extra moisture can make it clump. Press the toppings gently but firmly so they stay put when the tree is moved to the serving platter.
Flavor variations
You can play with the flavor without changing the festive look. Try adding a little garlic powder for more savory depth, or mix in finely chopped chives for a mild onion note. If your crowd likes a smoky taste, a pinch of smoked paprika works well too.
For a little sweetness, use yellow bell pepper instead of red and add a few pomegranate seeds as ornaments. That gives the tree a bright holiday color mix. You can also make a double batch and shape one large tree for the center of the table, which is a nice choice for big gatherings.
Presentation tips
Build the tree on a flat platter with enough room around the base for crackers. If you want it to look extra tidy, place a few parsley sprigs around the bottom like tree branches on the ground. A cheddar star cut with a small cookie cutter gives a clean finish, while lemon peel adds a brighter, lighter look.
Make-ahead options
This appetizer is a gift to anyone with a busy holiday schedule. You can mix and shape the cheese ball ahead of time, then freeze it for up to one month if needed. Thaw it in the refrigerator for one day before adding the parsley, nuts, peppers, and topper. If you are making it the same day, just chill it until firm and then decorate before serving.
For holiday hosts, make-ahead recipes like this one can save the whole evening.
How to Store Christmas Tree Cheese Ball: Best Practices
Refrigeration
Keep any leftover Christmas Tree Cheese Ball in an airtight container in the refrigerator. It should stay good for several days, though the parsley may lose some of its bright color over time. If possible, store the decorations separately and add fresh garnish right before serving again.
Freezing
You can freeze the shaped cheese ball, with or without decorations, for up to one month. For the best look, freeze the plain shaped tree first, then thaw it in the refrigerator for one day before adding the parsley and other toppings. Wrap it tightly in plastic wrap and then foil to help keep freezer odors out.
Serving again
This is not a dish that needs reheating. Instead, let it come back to a spreadable texture by sitting in the refrigerator until softened, then bring it to the table a little early. That gives you the best flavor and texture without making the cheese too warm.
Meal prep notes
If you want to prep for a party, you can make the cheese mixture ahead, chill it, and shape it later. This works especially well if your schedule is packed the day before a holiday event.

FAQs: Frequently Asked Questions About Christmas Tree Cheese Ball
How do you shape a Christmas tree cheese ball?
Shaping a Christmas tree cheese ball is simple and creates a festive centerpiece. Start by mixing softened cream cheese, cheddar, garlic powder, and seasonings until smooth. Chill the mixture for 30 minutes to firm up. For the tree shape, place a small bowl upside down on a serving plate as the base, then mound the cheese mixture around it in a cone shape, building layers wider at the bottom. Smooth with a spatula or gloved hands. Alternatively, spray a funnel with olive oil cooking spray, fill it with the mixture, refrigerate until set (about 2 hours), then gently remove and place on a plate. Add a cheese star on top with a toothpick for stability. Garnish with chopped parsley for “branches,” red bell pepper strips for “ornaments,” and pine nuts or seeds for texture. Refrigerate until serving. This method takes about 20 minutes active time and serves 10-12 as an appetizer. (112 words)
Can you freeze a Christmas tree cheese ball?
Yes, you can freeze a Christmas tree cheese ball for convenient holiday prep. Shape the plain cheese mixture into a tree form on parchment paper-lined baking sheet, but skip decorations like parsley or peppers until after thawing. Wrap tightly in plastic wrap, then foil, and freeze for up to one month. To use, transfer to the refrigerator and thaw for 24 hours. Once firm but softened, decorate with fresh garnishes: press parsley around the sides, add bell pepper pieces, and secure a cheddar star on top with a toothpick. Avoid refreezing after thawing. This make-ahead trick saves time during busy gatherings, and it tastes just as creamy. Serve with crackers or veggies for a crowd-pleasing dip that holds its shape perfectly. (118 words)
What can I use instead of pine nuts in Christmas tree cheese ball for nut allergies?
For nut allergies, easily swap pine nuts in your Christmas tree cheese ball with safe alternatives that maintain texture and look. Use extra finely chopped red bell peppers for color and crunch, or try sunflower seeds, shelled pumpkin seeds (pepitas), or chopped pretzels for a salty bite. If you want a milder option, diced green olives or capers add brininess without nuts. Mix about 1/4 cup into the cheese base before shaping, or sprinkle on after chilling for “tree bark” effect. These swaps keep the recipe nut-free while preserving the festive pine-like appearance. Always check labels for cross-contamination. This simple change makes it family-friendly for 10-12 servings, pairing great with gluten-free crackers. (109 words)
What is red pepper sauce in Christmas tree cheese ball recipe?
Red pepper sauce in a Christmas tree cheese ball recipe refers to any hot sauce made with red peppers, like Tabasco, Frank’s RedHot, or sriracha for a mild kick. It’s not a specific brand but adds tangy heat to balance the creamy cheeses—start with 1-2 teaspoons per 16 ounces of cream cheese, adjusting to taste. If you prefer no spice, substitute Worcestershire sauce, lemon juice, or a dash of paprika for flavor without heat. Blend it into the softened cheese mixture with garlic and herbs before chilling and shaping. This ingredient enhances savoriness, making the dip addictive. Taste-test as you mix to avoid overpowering the holiday tree’s fresh garnishes like parsley and peppers. Yields a zesty appetizer for holiday parties. (114 words)
How do you make the cheese star stay on top of a Christmas tree cheese ball?
To keep the cheese star sturdy on your Christmas tree cheese ball, insert a toothpick vertically into the top of the chilled tree shape, then press a small star cut from firm cheddar or processed cheese onto it. Chill the star first for 15 minutes to harden. For extra hold, spread a thin layer of cream cheese “glue” on the tree tip before attaching. Avoid soft cheeses that slump—opt for extra-sharp cheddar slices shaped with a cookie cutter. After decorating with parsley “needles” and pepper “lights,” refrigerate 30 minutes to set everything. This fixes wobbling issues and creates a photo-worthy topper. Serves 10-12; remove toothpick before serving with rye crisps or celery sticks. (103 words)
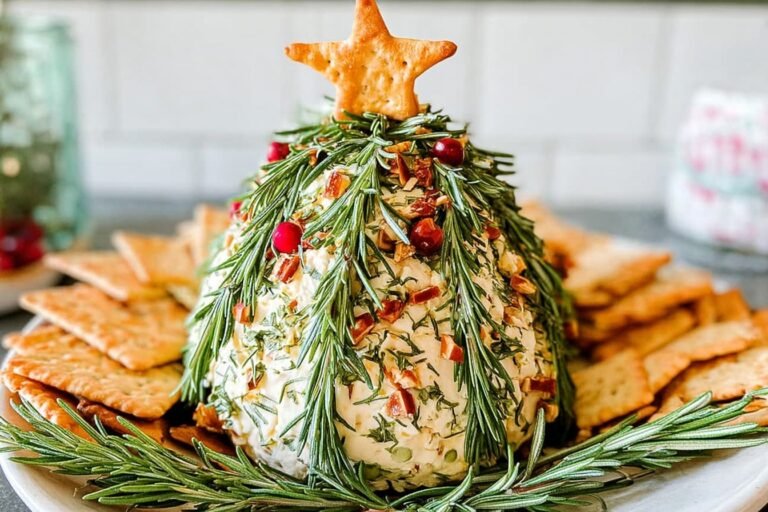
Christmas Tree Cheese Ball
🎄 Create holiday magic with this stunning Christmas Cheese Tree, an easy appetizer that impresses guests and sparks joy at parties!
🧀 Creamy, savory flavors in a festive shape make it a must-try for effortless entertaining and delicious snacking.
- Total Time: 1 hour
- Yield: 10 servings
Ingredients
– 3 packages (8 ounces each) cream cheese, softened
– 4 cups shredded sharp cheddar cheese (16 ounces)
– 2 tablespoons grated onion
– 1/2 teaspoon ground dry mustard
– 5 or 6 drops red pepper sauce
– 1 cup finely chopped parsley for serving and decoration
– 1/2 cup pine nuts for serving and decoration
– 1/4 cup chopped red bell pepper or yellow bell pepper for serving and decoration
Instructions
1-First step: Mix the cheese base Start by placing the softened cream cheese in a large mixing bowl. Add the shredded sharp cheddar, grated onion, ground dry mustard, and red pepper sauce. Mix until everything is well combined and the mixture looks even, creamy, and thick. A sturdy spoon, hand mixer, or rubber spatula all work well here. Take a quick taste before chilling. If you want a bit more kick, you can add another drop or two of red pepper sauce. If you prefer a milder appetizer, keep it as written. The flavors will deepen a little as the cheese mixture chills.
2-Second step: Chill until firm enough to shape If you are making two cheese balls, divide the mixture in half. If you want one large Christmas Tree Cheese Ball, leave the mixture whole. Either way, cover the bowl and refrigerate it until it is firm enough to shape. This usually takes about 30 to 50 minutes, depending on how soft the cream cheese was at the start. This step matters because the mixture needs to be sturdy enough to hold a cone shape. If you rush it, the tree may slump. If you are planning ahead, you can even chill it a little longer and let it soften slightly before shaping.
3-Third step: Shape the tree Place the chilled cheese mixture onto a cookie sheet. Use your hands or a spatula to form it into a cone that looks like a Christmas tree. If you are making two, shape both portions into smaller cones. If you are making one large appetizer, build a taller tree with a wider base. Try to keep the bottom a little wider than the top so it looks more like a real tree. A smooth surface helps the toppings stick better, but it does not need to be perfect. Holiday appetizers are allowed to look homemade and cheerful.
4-Fourth step: Add the parsley coating Spread the finely chopped parsley in a shallow dish or on a plate. Roll the shaped cheese tree in the parsley, pressing lightly so the coating sticks evenly. If needed, gently pat extra parsley onto any spots that look bare. This is what turns the cheese ball into a tree. The parsley gives it that fresh green color and makes the whole appetizer feel festive. It also adds a bit of freshness to balance the rich cheese.
5-Fifth step: Create the garlands Press the pine nuts onto the tree in horizontal lines to form garlands. Work from top to bottom, spacing the lines evenly around the tree. The pine nuts add texture and help mimic the look of holiday decorations draped across branches. If you are serving guests with nut allergies, swap the pine nuts for chopped pomegranate seeds, sunflower seeds, or extra red bell pepper pieces. That way you still get color and texture without using nuts.
6-Sixth step: Add ornaments and the star Attach the chopped red or yellow bell pepper pieces to the tree as ornaments. A few small pieces scattered around the surface are all you need. Less is often more here, since the parsley and pine nuts already give you plenty of decoration. For the top, cut a star from a slice of cheddar cheese or use a piece of lemon peel for a bright, simple topper. If the star keeps wobbling, use a toothpick to hold it in place. Chill the decorated tree again for a short time so everything sets up nicely.
7-Seventh step: Serve with crackers Move the finished Christmas Tree Cheese Ball to a serving platter and surround it with assorted crackers. A sturdy cracker works best because the cheese ball is thick and rich. If you have a spreader on the plate, that helps too. Let the cheese ball sit out for a short time before serving so it softens slightly. That makes it easier to spread and gives the best texture. If you made it ahead and chilled it for a long time, take it out a little early so it is not too firm at the table.
Last Step:
Please leave a rating and comment letting us know how you liked this recipe! This helps our business to thrive and continue providing free, high-quality recipes for you.Notes
🎉 Make one large tree for big parties to serve more guests easily.
❄️ Freeze the shaped cheese tree up to one month ahead; thaw overnight before decorating.
🌰 Swap pine nuts for bell peppers or seeds if avoiding nuts for allergies.
- Prep Time: 10 minutes
- Chilling: 50 minutes
- Cook Time: 0 minutes
- Category: Appetizers
- Method: No-Bake
- Cuisine: American
- Diet: Vegetarian
Nutrition
- Serving Size: 2 ounces
- Calories: 350 kcal
- Sugar: 2 g
- Sodium: 500 mg
- Fat: 30 g
- Saturated Fat: 18 g
- Unsaturated Fat: 10 g
- Trans Fat: 0 g
- Carbohydrates: 4 g
- Fiber: 1 g
- Protein: 12 g
- Cholesterol: 90 mg





