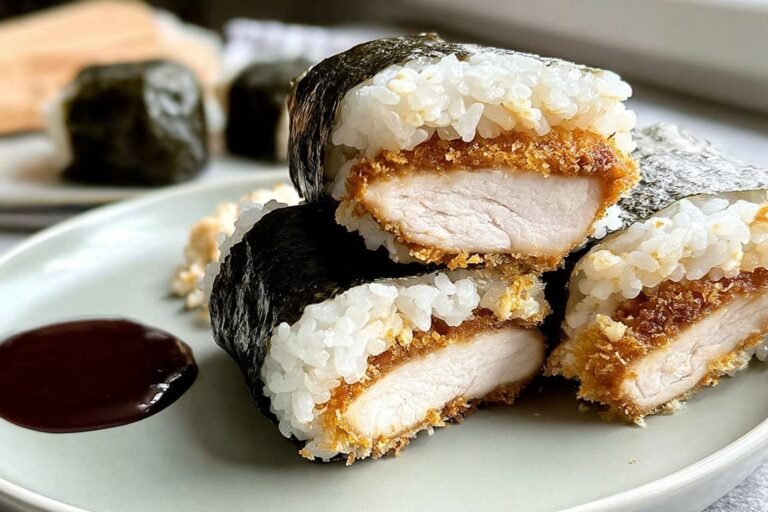
Ingredients
– 1 pound boneless, skinless chicken thighs Pounded to ½ inch thickness for even cooking and maximum juiciness
– 2 large eggs Creates the wet batter that helps the panko adhere to the chicken
– 3 tablespoons all-purpose flour Thickens the egg mixture into a cohesive batter
– ½ teaspoon salt Seasons the batter from within
– ½ teaspoon black pepper Adds subtle warmth and depth to the coating
– 2 cups panko breadcrumbs Japanese-style breadcrumbs create the signature crispy, airy texture
– Oil for frying Use a neutral oil like vegetable or canola with a high smoke point
– Nori sheets, cut into thirds Dried seaweed wrappers that hold everything together
– 6 cups sushi rice (short-grain rice) The sticky texture is essential for holding the musubi shape
– Tonkatsu sauce A sweet and tangy Japanese barbecue-style sauce that ties all flavors together
Instructions
1-First Step: Prepare the Chicken. Start by preparing your chicken thighs properly. Place 1 pound boneless, skinless chicken thighs one at a time inside a plastic bag or between two sheets of plastic wrap. Using a meat mallet or rolling pin, gently pound each piece to an even ½ inch thickness. This step is crucial because uniform thickness ensures the chicken cooks evenly without drying out. Thicker spots would take longer to cook, while thinner areas would overcook and become tough. Once pounded, set the chicken aside on a clean plate while you prepare the batter and breading station.
2-Second Step: Create the Wet Batter. In a shallow dish that’s wide enough to dip the chicken pieces, whisk together 2 large eggs, 3 tablespoons all-purpose flour, ½ teaspoon salt, and ½ teaspoon black pepper. Mix until smooth and no lumps remain. The consistency should be slightly thinner than pancake batter. If it seems too thick, add water one tablespoon at a time. If too thin, sprinkle in a bit more flour. This combined egg-and-flour batter is a time-saving technique that works just as well as the traditional three-step breading process. The flour in the mixture helps create a thicker coating that really grabs onto those panko crumbs.
3-Third Step: Bread the Chicken. Set up your breading station with the wet batter in one shallow dish and 2 cups panko breadcrumbs spread on a plate or in another shallow dish. Take one piece of pounded chicken and dip it into the wet batter, making sure both sides are completely coated. Let any excess batter drip off for a few seconds. Transfer the battered chicken to the panko breadcrumbs and press firmly to ensure good coverage on both sides. The panko should create a thick, even coating. Repeat this process with all chicken pieces, placing them on a wire rack or clean plate as you work.
4-Fourth Step: Fry the Chicken. Pour about 2 inches of oil into a deep skillet or Dutch oven and heat over medium-high heat until it reaches 350°F. Use a kitchen thermometer to check the temperature, as this is essential for proper cooking. Oil that’s too cool will make the chicken greasy, while oil that’s too hot will burn the coating before the chicken cooks through. Carefully lower the breaded chicken pieces into the hot oil, being careful not to overcrowd the pan. Fry for 4 to 6 minutes, flipping once halfway through, until the coating is deep golden brown and the internal temperature reaches 165°F. Transfer the fried chicken to a wire rack to drain and cool for at least 5 minutes. This resting period allows the juices to redistribute throughout the meat.
5-Fifth Step: Prepare the Rice. While the chicken fries, prepare your assembly station. Have your 6 cups of cooked sushi rice ready and still slightly warm, as warm rice is easier to mold and holds its shape better. Cut your nori sheets into thirds using kitchen scissors or a sharp knife, creating long strips that will wrap around the rice and chicken.
6-Sixth Step: Assemble the Musubi. Now comes the fun part, putting it all together. Place a strip of nori on a flat surface with the rough side facing up. Moisten your musubi mold or empty can with water to prevent sticking. Fill the mold halfway with sushi rice, pressing down firmly to create a compact, even layer. Release the rice block onto the center of the nori strip by tapping the mold gently. Spread a small amount of tonkatsu sauce on top of the rice. Place a piece of fried chicken on the sauce, then add another small drizzle of sauce on the chicken. Fold one end of the nori over the rice and chicken, then fold the other end to create a neat package. Seal the edges with a little water and press gently to help the nori stick to itself. Repeat with remaining ingredients to make about 6 musubi. Serve immediately while the chicken is still crispy, or wrap individually in plastic wrap for later.
Last Step:
Please leave a rating and comment letting us know how you liked this recipe! This helps our business to thrive and continue providing free, high-quality recipes for you.Notes
🍗 Pound chicken thighs evenly for uniform juiciness and cooking.
🥚 Use a single wet batter of egg and flour to simplify breading without losing crispiness.
🔧 Moisten your musubi mold before use to prevent rice from sticking.
- Prep Time: 30 minutes
- Cook Time: 15 minutes
- Category: Poultry
- Method: Deep-Frying
- Cuisine: Hawaiian
Nutrition
- Serving Size: 1 musubi
- Calories: 559 kcal
- Sugar: 2 g
- Sodium: 656 mg
- Fat: 9 g
- Saturated Fat: 2 g
- Unsaturated Fat: 5 g
- Trans Fat: 0.03 g
- Carbohydrates: 81 g
- Fiber: 4 g
- Protein: 34 g
- Cholesterol: 190 mg